Enable Supervised Mode on iPhone & iPad in 5 minutes
Quickly set up Supervised Mode on an iOS device without losing data. No hard reset required!

Apple's Supervised Mode is a powerful feature that can be enabled on an iPhone or iPad to unlock additional restrictive capabilities. It's an ideal solution for adults who want to restrict how they use their own iPhone or to set up a shared family device with limited functionality. Supervised Mode can be used to block websites and apps and enforce certain settings. In this comprehensive guide, we'll walk you through how to quickly enable Supervised Mode on iPhone from start to finish.
At Tech Lockdown, we have our own tool for quickly enabling Supervised Mode without requiring a hard reset. The process is simple and accessible to anyone.
Supervised Mode use-cases
If you're curious about what you can do once Supervised Mode is enabled on an iPhone or iPad, watch our demo video on YouTube walking through common use-cases:
Using the Supervised Mode Setup tool to configure an iOS device
In this section, we'll walk you through enabling Supervised Mode on an iPhone or iPad using Tech Lockdown's Supervised Mode Setup tool. The process is easy and only takes a few minutes.
Follow along with our YouTube video showing how to enable Supervised Mode:
You'll need the following to continue with this guide:
- A Windows or Mac computer. Either device is compatible with our Supervised Mode Setup tool.
- An Apple charging cable that can connect to your computer.
- Although no data is lost during this process, it's generally a good idea to back up your device. Check out our FAQ on how to back up an iPhone .
Step 1: Download the Supervised Mode Setup tool
Tech Lockdown's Supervised Mode Setup tool can be used to quickly enable Supervised Mode on an iPhone or iPad without any data loss. The process is simple and only takes about 5 minutes.
If you are on Mac, you'll see the option to download for Apple Silicon or Intel. If you purchased your Mac after November 2020, then you should download the Apple Silicon version. For older Macs, download the Intel version.
On Mac, you can open Finder > Downloads, then double click the archive to quickly extract the contents.
Step 2: Connect the iOS device to your computer
For the Supervised Mode Setup tool to configure your device, you'll need to connect your device to your computer.
Recent iOS devices use a USB-C cable while older versions use the Apple lightning cable.
When you unlock your iPhone or iPad (and it is plugged into the computer), it might ask you to trust the computer. Make sure you tap trust.
Step 3: Temporarily turn off Find my iPhone
The iPhone's activation lock feature conflicts with the Supervised Mode setup process, so you'll need to temporarily disable it. You can re-enable it after the setup process is complete.
Here's how to turn off Find my iPhone:
- Open the settings app on your iPhone and tap your name at the top
- Go to
Find My
- Go to
Find My iPhone
- Toggle off
Find My iPhone
- Enter your Apple Account Password and then
Turn Off.
- Find My iPhone should turn off after a few seconds
Step 4: Upgrade the device with Supervised Mode
Now the Supervised Mode Setup tool will upgrade the connected iOS device so that the mode is enabled properly.
If you receive this error:
Close the tool and try again.
Your iPhone will turn off and then back on again. You should see a screen prompting you to accept the upgrade.
Here's generally what you should see on your iPhone or iPad while supervised mode is being enabled:
- The device should power off
- It should turn back on
- It should prompt you to swipe up or press the home button to upgrade
- You'll need to enter your device's passcode to confirm the upgrade
- The device should start loading
- You should see the welcome screen
You can unlock your iPhone and start using it as normal.
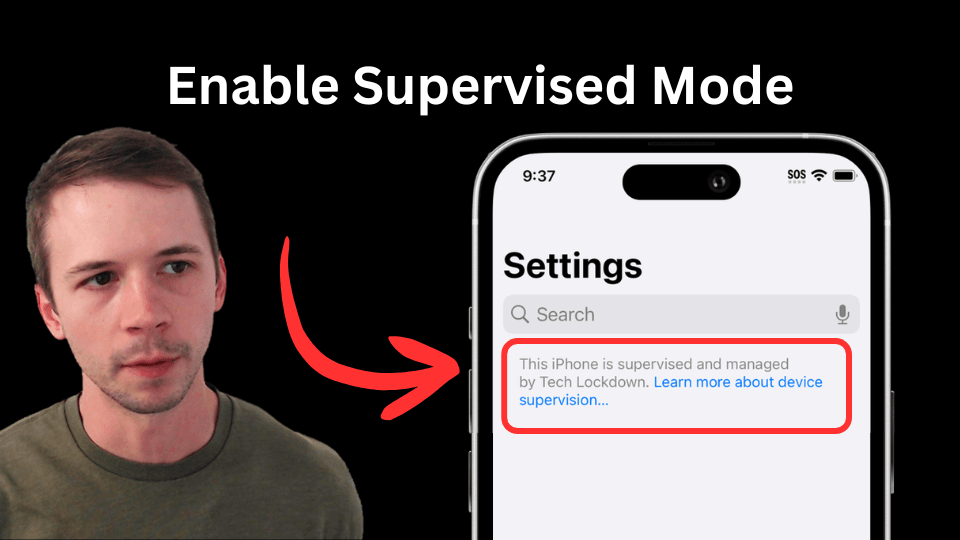
Step 5: Confirm Supervised Mode is enabled
Once the device turns on again and you see the welcome screen, you can check to see that Supervised Mode was enabled properly.
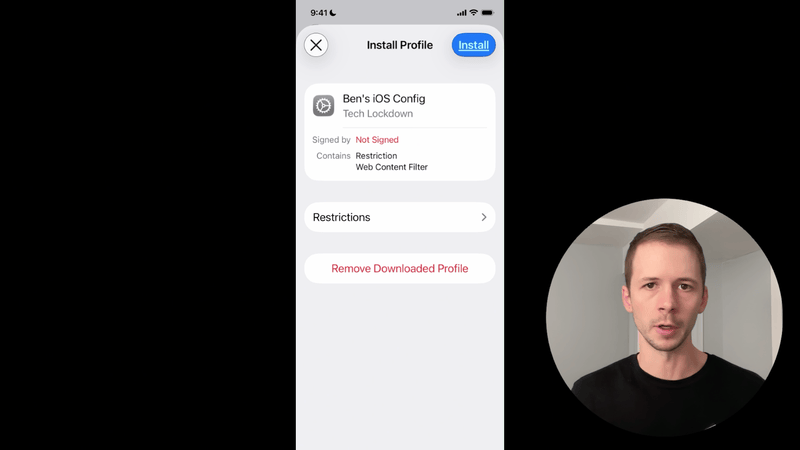
Using the Apple Config Generator to Customize Restrictions
Now that Supervised Mode is enabled on the iPhone or iPad, you can use the Tech Lockdown Apple Config Generator to customize and add the config files to your supervised device.
This config generator was specifically designed for adults with a few key self-control features built in (more on this later).
Types of Restrictions
Website Restrictions
Navigate to the Web section of the Apple Config Generator to specify web content filtering preferences. This will lock on and customize the built-in filter Apple provides (similar to the one you can access in Screen Time settings).
Toggle on Enable Automatic Adult Content Filter to automatically block most adult websites:
When this option is selected, the Safari app will disable the option to start a private browser window. If you find that a website is wrongly blocked, you can add exceptions to the adult content filter. Web content filtering works on most major browsers on an iPhone.
Then, you can add your own list of URLs to block. You can specify a website blocklist that includes full page URLs. This lets you precisely target what you want to block, allowing you to access some pages on a website but not others.
If you have the adult website filter enabled, you do not need to specify adult websites in your website blocklist. Use this list for additional URLs that aren't classified as adult content.
There are two other options you should consider: disabling internet results in Spotlight search and removing the ability for Siri to access user-generated online content.
App Restrictions
One of the most important areas of the Apple Config Generator is customizing app restrictions to completely block apps on iPhone .
Get started by managing which apps can be installed on the device. You can choose between two modes:
- Allowlist: block all apps other than ones you approve.
- Blocklist: block only specified apps.
When using allowlist mode, choose all of the apps that you want to use on the supervised device. Any app not included on this list, even if it was pre-installed on the device, will be removed and can't be opened at all. The only exception is the Phone and Settings app - these will appear even if you don't add them to your allowlist (there's no way to block them).
When you click Add Apps, you'll see some of the most popular apps that are added to an app allowlist. You'll need to select each app you want to be available on the device (even the camera app).
If you aren't able to find your app by searching for it, try changing the country (search defaults to the United States). Some apps aren't available in every region.
If you decided to use the Blocklist approach instead, the first step is to determine if you want to block apps based on age rating. Adjust the slider to change the maximum app age rating allowed. You'll see examples of apps that will be blocked based on the selected rating.
Any app that is already installed that violates the age rating will be removed from the device. It's important to note that the major web browsers, like Google Chrome, are rated 17+. Safari is also rated 17+, but it's excluded from age-based app blocking. Many investment, finance, and dating apps are rated 17+. As a result, age-based app blocking might not be a good approach for an adult's iPhone.
Once you choose a max app age rating (or none at all), you can customize your list of blocked apps.
Next, you should restrict Deleting Apps and Hiding Apps to ensure content filtering isn't bypassed by deleting the underlying application.
Additionally, you can also customize content controls within Apple's default apps. For example, you can choose to restrict Explicit Apple Store Content, which impacts Apple Videos, Music, News, and Podcasts.
Under the General tab in the Apple Config Generator, you can further customize content restrictions like limiting Movie and TV ratings on Apple TV.
Network Restrictions
Under the Network tab of the Apple Config Generator , you can customize some options for restricting changes to internet connection settings.
First, you should set up a DNS Content Policy and customize DNS filtering rules to block categories of websites and enforce SafeSearch.
Once this is done, you can use the Enforce DNS Settings section of the config editor to lock DNS settings to point to this content policy.
This will ensure that DNS settings aren't changed and that DNS content filtering is used.
There are a few other options to consider as well:
- Modifying Personal Hotspot settings: Some people choose to restrict this, even though it can be quite limiting
- Force WiFi use: If you have configured your home router to block adult content , it might be useful to prevent a supervised device from turning off Wifi and using an unfiltered 4g/5g connection when at home. However, this isn't needed if you have locked your DNS settings to point to a dns filter since this will apply to 4g/5g connections as well.
Restricting Hard Reset
In the general tab, you can disable the ability to Erase Content and Settings using the settings app on the supervised device. This closes down a rare loophole that some people encounter.
Disabling Generative AI Features
The Apple Intelligence features can be turned off and disabled as well. Certain features, like Image Playground and Genmoji, are common options people disable:
Protecting Config Files from being Removed
In Config Preferences in the Apple Config Generator, you can choose to enable Removal protection.
You can choose to require a pin to be entered or Prevent Uninstall from the settings app entirely.
Locking the Apple Config Editor
If you are managing your own supervised device and want to prevent yourself from reducing the strictness of your config, you can lock the editor. Locking the editor will prevent you from reducing your restrictions, but you'll still be able to add restrictions.
First, you'll need to lock your Tech Lockdown profile .
Then, click the cog icon in the config generator to open editor preferences:
Enable profile locking restrictions so that when your Tech Lockdown profile is locked, the editor is also restricted:
If you need to reduce restrictions in the config editor, you'll need to unlock your Tech Lockdown profile.
Syncing Config Changes to your Supervised Device
Once you've customized your config using the Apple Config Generator , click the Sync to Device button to get started adding it to your supervised device.
Whenever you make changes to your supervised config, you'll need to follow these steps to "update" the config on the device.
Frequently Asked Questions
Is there any data loss during the Supervised Mode setup process?
No, the Tech Lockdown Supervised Mode Setup tool doesn't erase the data on your device. Once Supervised Mode is enabled, you'll have access to the exact same data that you had prior to the setup process. This includes app data.
Will I need to reinstall my apps after enabling Supervised Mode?
No, the Supervised Mode Setup tool does not require you to backup or restore any data. As a result, you will not need to reinstall your apps after Supervised Mode is enabled.
Should I backup my device before enabling Supervised Mode?
Although you won't lose any data during the Supervised Mode setup process, it's a good practice to periodically backup your iPhone or iPad.
Prevent "Remove Profile" in VPN & Device Management settings
Apple config files can be uninstalled from the VPN & Device Management section of iOS settings by tapping "Remove Profile." When a Supervised Mode is enabled, you can prevent profile removal. Here's how:
Why bother enabling Supervised Mode?
Although the setup process is simple and accessible to anyone with an iOS device, some people ask us why they would want to enable Supervised Mode.
The technical explanation is that Apple Configuration Profiles, which can be used to set restrictions on an iOS device, have some options that are exclusive to devices with Supervised Mode enabled.
In our experience, it's a core requirement for people who want to block porn on iPhone or create a dumb iPhone .
How to back up a device before enabling Supervised Mode
Although there is no data loss while using the Supervised Mode Setup tool, it's a good practice to backup your device.
Back up with iCloud Sync
One way to continuously back up an Apple device is to configure iCloud sync.
Backing up an iPhone using a Mac
Another way to backup an iOS device for free is by using a Mac to backup your iPhone .
Fully backing up an iPhone with iCloud backups
Instead of using your Mac to run a full backup, you can opt to use iCloud instead. If you have iCloud+ with the available storage, this might be the best option. However, the backup process can take longer depending on your internet speed.
Backing up an iPhone using iTunes on a Windows Computer
If using a Mac or iCloud full backup isn't an option for you, a Windows PC with iTunes can be used to fully backup your iOS device. An iPhone or iPad can be backed up on Windows using iTunes.
What's the difference between Screen Time and Supervised Mode?
When an iPhone or iPad is set up as a supervised device, you gain access to additional restrictive capabilities. The key difference between Supervised Mode and iPhone parental controls is that these restrictions can be enforced for an adult. Furthermore, some additional restrictions can be accessed (like controlling the network settings on the device).
Using Supervised Mode to Protect VPN & DNS Settings
If you are trying to block adult content on an iPhone , chances are that you (or an app) will customize the DNS or VPN settings to point to a DNS filtering service. Unfortunately, it's normally very easy to bypass this connection by adding conflicting DNS or VPN settings. Apple doesn't provide a way to prevent this on a standard iPhone.
Fortunately, when Supervised Mode is enabled, you can protect DNS settings so that they are locked onto your preferred filtering provider.
Once protected, it won't be possible for an app or the device's user to add conflicting DNS entries or modify existing ones. This closes down a critical content filtering loophole.
However, even with DNS settings being protected, a user could still add a VPN app, which sets a VPN connection and bypasses the iPhone's DNS filter.
This is another example where Supervised Mode is incredibly valuable; you can easily add a restriction that prevents a user or an app from adding a conflicting VPN configuration.
The option to add a VPN is completely removed, and apps lose the ability to request this permission.
Comprehensive App Restrictions
One of the best use cases is to use supervised mode as a powerful iPhone app blocker . Apps downloaded from the app store can pose a serious challenge for content blocking, and it's often difficult to reliably filter these apps.
For example, an app like TikTok can't be filtered to block explicit content, so many people choose to block the TikTok app on iPhone entirely .
Supervised mode can be used to control which apps can be installed from the App Store and added to the device.
When an app is blocked, it's not possible to open it on the device, even if it was downloaded previously. If the app is somehow added to the device outside of the app store, it will still be blocked. It's also possible, but not necessary, to completely disable the iPhone app store .
Enforced Web Content Filtering
Apple provides a powerful built-in web content filter that can be used to automatically restrict adult websites and your own list of URLs you want to restrict. It's possible to restrict specific pages on a website without blocking the entire website. For example, this is ideal if you are looking to block adult content on Reddit , where some sections of the website need to be restricted without blocking the platform completely.
When this web content filter is configured with supervised mode, it can be locked on and cannot be overridden using the corresponding section of Screen Time.
Protect Apps from Being Uninstalled
Most DNS filtering providers will provide an app that establishes the connection to the content filter. This app will usually add a VPN configuration to set up this connection. However, if the app is deleted from the device, this VPN configuration will also be removed, which completely bypasses content filtering.
Supervised mode can be used to protect iPhone apps from being deleted , which completely closes down this bypass technique. See also our dedicated guide: Supervise an iPhone with Apple Configurator .